Unreal Artist Docs
Working with AYON in Unreal Engine
AYON in Unreal Engine allows you to create, publish and manage assets and scenes across different projects and platforms. AYON handles tasks such as versioning, validation, synchronization, rendering and publishing in Unreal.
To launch Unreal Engine with AYON user does not use Epic Games Launcher but AYON Launcher instead.
Getting started with Unreal Engine in AYON
Prerequisites
AYON supports the latest Unreal Engine versions. To use it, you need to install the AYON Integration plugin from the Unreal Marketplace.
If you encounter following warning when you run Unreal, your installation is missing Qt bindings. Here are the steps to fix it.

Unreal project and data structure
While other hosts in AYON have specific workfiles for each task, Unreal Engine is a bit different. An Unreal project is made by design to contain all the content of a project, so it wouldn't make sense to have more than one. We recommend creating a task in AYON specifically for Unreal, and use that task to manage the Unreal project. This way user selects the dedicated task for Unreal Project in AYON Launcher and launch it by UE icon at the bottom.

For linear animation projects, and in particular for episodic formats, we still recommend keeping only one Unreal project. Having a project for each episode would result in duplicated data between the episodes, and it would be hard to manage.
General Update on Unreal 5.4
AYON has implemented some new features in regards to Unreal 5.4 such as Sequence Hierarchy in AYON menu for building shot structure accordingly to the folder hierarchies. Moreover, it introduces maya preset options for the alembic loaders to ensure the assets loaded in current transform. It also adds the inventory action to connect animation/camera to the level sequence loaded from the layout product type. In addition, AYON allows users to customize their asset directories(except camera and layout) before loading in the setting.
AYON Menu and Tools
The AYON menu will be the main tool to interact with AYON in Unreal. It will allow you to create, load, publish and manage assets.
- Load is the tool to load assets from AYON into Unreal.
- Publisher is the tool to create and publish assets from Unreal to AYON.
- Manage (Inventory) is the tool to manage loaded assets.
- Render starts the render for a selected
AyonPublishInstance. - Build Sequence Hierarchy builds the shot structure in regards to the folder hierarchy.
- Experimental tools contains tools under developement.

Default structure
The structure of the project data is handled by AYON. The first time you create an instance or load an asset, AYON will create a folder called AYON in the Content Browser. This folder will contain all the data handled by AYON, and it is organised as follows:
/Content/AYON/is the default AYON root directory./Content/AYON/{your_folder_path}/{your_product_name}is the default directory which contains all the single assets that are loaded from AYON. Users can customize their asset directories throughayon+settings://unreal/loaded_asset_dirBy default, the asset directories for all loaded assets are{folder[path]}/{product[name]}_{version[version]}

::: note There are several formats we can use as the template for the asset directories. For example: {folder[name]}: folder name {folder[path]}: folder path {product[name]}: product name {product{productType}}: product type {version[version]}: version number {representation[name]}: name of the representation type :::
/Content/AYON/Assetscontains all the single assets that are loaded from AYON./Content/AYON/PublishInstancescontains all the instances that are created in Unreal.- The rest of the directories contain all shot data of your AYON project, keeping same structure as the AYON project. In particular, they contain the levels and level sequences that are generated when you load Layout and Camera assets via Load tool.

AYON data folders are color coded by unique color scheme for easier navigation. As seen on the picture above.
DataAssets
AYON introduces two type of Unreal Assets acting as sort of containers: AyonAssetContainer

and AyonPublishInstance.

These assets are used only to manage Ayon metadata in Unreal, and they are not meant to be used directly in the scene. The first ones, with _CON suffix in the name, are used to store metadata of loaded assets, while the second ones, with _INS suffix in the name, for metadata of assets that are going to be published.
Static and Skeletal Meshes
Unreal handles models and rigs as Static and Skeletal Meshes. These meshes can be loaded as FBX or as Alembic. The latter can be also be loaded as a point cache, but with some limitations.
Loading
To load a Mesh, follow these steps:
- Choose AYON → Load ....
- Right-click your mesh.
- Select Import Static Mesh or Import Skeletal Mesh.


The meshes will be loaded in the /Content/AYON/Assets folder, and they will be automatically added to the AyonAssetContainer asset that is created in the same folder. The Container will only contain the metadata of the asset, and it will not be used in the scene. Instead, in the same folder you will find the imported mesh, which can be added to the scene as usual.
New Feature for 5.4: If you are using the Alembic loaders(e.g Import Alembic Point Cache, Import Alembic Static Mesh), you can choose which presets you want to load by clicking the small memo icon, and it will pop up the dialog to allow you to choose which preset you would like to use.(By default is Maya)
The mesh is named accordingly to their allocated folder name, version number and file extension(i.e. testProject_v001_abc)

Updating/Setting Version
To manage loaded assets, click on the AYON icon in Unreal’s main taskbar, and select Manage.

You will get a list of all the assets that have been loaded in the project. The version number will be in red if it isn’t the latest version.
To update the asset:
- Right click on the element that has available updates.
- Click Update to latest or Set version.
Every time you update/set the version, Ayon would create a new exclusive version folder which stores the meshes in the updated version if it never loaded.
Removing
To remove loaded assets, click on the AYON icon in Unreal’s main taskbar, and select Manage.
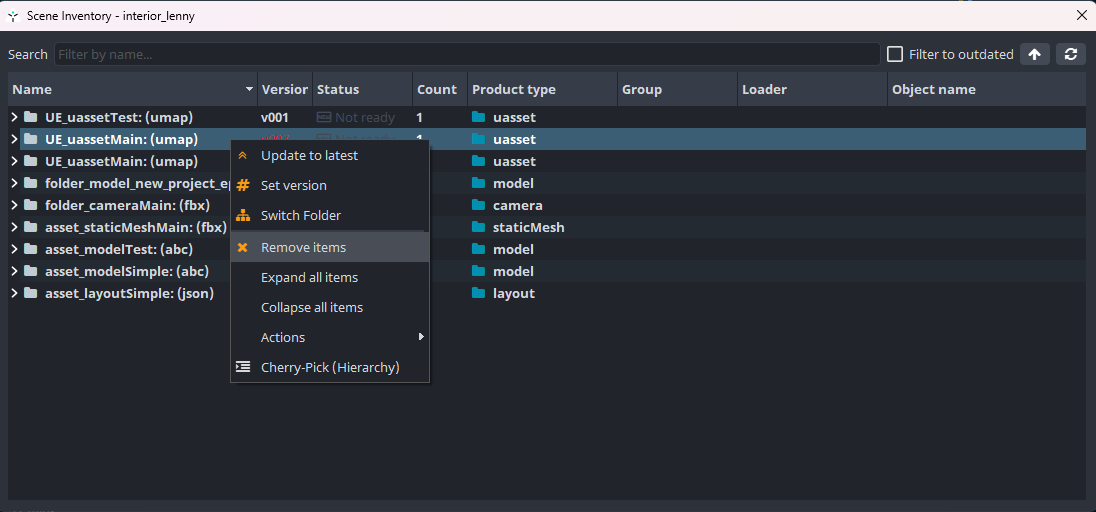
- Right click on the element you want to remove
- Click Remove items
- It would remove the selected element
Publishing
To publish a mesh from Unreal, you need to create a publish instance.
- Select the mesh in the Content Browser.
- Click on AYON → Publisher ... to open the Publisher screen.
- On the top bar, switch to the Create tab.
- In the Creator screen, select Static Mesh or Skeletal Mesh.
- Set the name of the product.
- Set Use selection.
- Click on Create. This will create a
AyonPublishInstancefile in/Content/AYON/PublishInstances, with the metadata necessary to publish the asset.


- Click on AYON → Publisher ... to open the Publisher screen.
- On the top bar, switch to the Publish tab.
- On the left, you will see all the publish instances that you have created.
- Select the ones that you want to publish, and click on Publish.
UAssets
Unreal Engine uses UAssets to store assets. AYON supports publishing and loading of this kind of assets.
Loading
To load a UAsset, follow these steps:
- Choose AYON → Load ....
- Right-click your asset.
- Select Load UAsset.

The UAssets will be loaded in the /Content/AYON/Assets folder, and they will be automatically added to the AyonAssetContainer asset that is created in the same folder. The Container will only contain the metadata of the asset, and it will not be used in the scene.
The UAssets is named accordingly to their allocated folder name and unique version number(i.e. testUAsset_01)
Updating
To manage loaded assets, click on the AYON icon in Unreal’s main taskbar, and select Manage.

You will get a list of all the assets that have been loaded in the project. The version number will be in red if it isn’t the latest version.
To update the asset:
- Right click on the element that has available updates.
- Click Update to latest and Set version.
Every time you update/set the version, Ayon would create a new exclusive version folder which stores the meshes in the updated version if it never loaded.
Removing
To remove loaded assets, click on the AYON icon in Unreal’s main taskbar, and select Manage.

- Right click on the element you want to remove
- Click Remove items
- It would remove the selected element
Publishing
Publishing UAssets has some limitations currently. You can only publish a single UAssets, and it must not have any dependencies.
Before publishing, you need to make sure the template, which is used for publishing UAssets, has been set up.
To publish a UAsset, you need to create a publish instance.
- Select the UAsset in the Content Browser.
- Click on AYON → Publisher ... to open the Publisher screen.
- On the top bar, switch to the Create tab.
- In the Creator screen, select UAsset.
- Set the name of the product.
- Click on Create. This will create a
AyonPublishInstancefile in/Content/AYON/PublishInstances, with the metadata necessary to publish the asset.


- Click on AYON → Publisher ... to open the Publisher screen.
- On the top bar, switch to the Publish tab.
- On the left, you will see all the publish instances that you have created.
- Select the ones that you want to publish, and click on Publish.
Layouts for linear animation
There are two different layout options in Unreal, depending on the type of project you are working on. This section explains how to handle layouts for linear animation. To do this, AYON generates Master Sequences to track the whole level sequence hierarchy. To set this mode, you should turn on the setting Generate level sequences when loading layouts in AYON Project Settings → Unreal Engine.

Loading
To load a layout, follow these steps:
- Choose AYON → Load ....
- Right-click your layout.
- Select Load Layout.

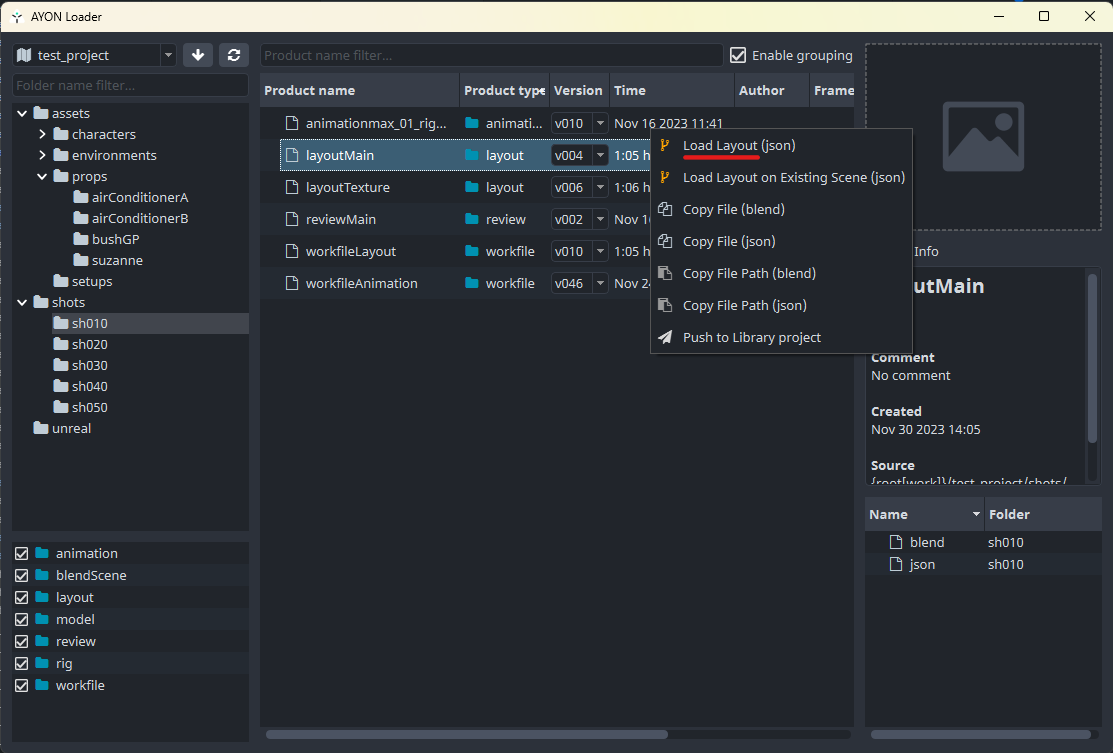
If you need to load multiple layouts, you can select more than one task on the left, and you can load them together.

Navigating the project
The layout will be imported in the directory /Content/AYON. The layout will be split into two subfolders. In /Content/AYON/Assets you will find all the rigs and models contained in the layout, while the folder with the name of the layout will contain the levels and the level sequences.
Typically, in a linear animation project, the project will be split into several shots, and shots are organised in scenes. If the project is episodic, scenes will also be organised in episodes. To reflect this structure, whenever you load a layout, AYON will create the same hierarchy of your project with Level Sequences and Levels.
Cameras and Layouts follow the same structures, so when loading one of the two, you will get the same hierarchy. If you load one of them first, the whole hierarchy will be generated. If you load the other one later, and the hierarchy was already generated, the new asset will be added to the existing hierarchy.
In the main folder of the layout (or the episode folder, in case of an episodic project), you will find the master level and the master level sequence and the folders for all the scenes in the episodes. AYON is then flexible to accomodate any kind of project structure, and each layer will have its own level sequence. Finally, each shot will have again their own level sequence, and their own level.
Adding environment or lighting to the master level
After opening the master level, open the Levels window (from the menu Windows → Levels), and you will see the list of the levels of each shot of the episode for which a layout has been loaded.

Here you will be able to add any other level that you need to the master level. For example, you can add the environment level to the master level, so that it is always loaded when you open the master level, or any level that contains the lighting.
To add a level to the master level:
- Open the Levels window from the menu Windows → Levels.
- Click on the Levels menu in the top right corner of the window.
- Click Add Existing....
- Select the level you want to add to the master level.
After adding the environment level to the master level, you will need to set it as always loaded by right clicking it, and selecting Change Streaming Method and selecting Always Loaded.

Otherwise, you will need to set the visibility in the master sequence.
Updating
To manage loaded layouts, click on the AYON icon in Unreal’s main taskbar, and select Manage.

You will get a list of all the assets that have been loaded in the project. The version number will be in red if it isn’t the latest version.
To update the layout:
- Right click on the element that has available updates.
- Click Update.
DO NOT update rigs or models imported with a layout. Update only the layout.
Layouts for interactive projects
There are two different layout options in Unreal, depending on the type of project you are working on. This section explains how to handle layouts for interactive projects. In this case, AYON will not generate the level sequences hierarchy, but will load the layout in a single level and with a single level sequence. To set this mode, you should turn off the setting Generate level sequences when loading layouts in AYON Project Settings → Unreal Engine.

Loading
To load a layout, follow these steps:
- Choose AYON → Load ....
- Right-click your layout.
- Select Load Layout.


The layout will be imported in the directory /Content/AYON. The layout will be split into two subfolders. In /Content/AYON/Assets you will find all the rigs and models contained in the layout, while the folder with the name of the layout will contain the levels and the level sequences.
The layout level will and should contain only the data included in the layout. To add other elements, like the environment or the lighting, you have to create a master level, and add the layout level as a streaming level.
- Create the master level.
- To create a level, click on File → New Level.
- Select Empty Level or one of the presets.
- Save the level.
- Open the master level.
- Open the Levels window from the menu Windows → Levels.
- Click on the Levels menu in the top right corner of the window.
- Click Add Existing....
- Select the level you want to add to the master level.
The following example shows a master level in which have been added a level with lighing and the layout level.
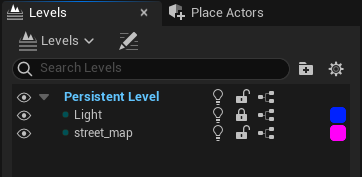
Updating
To manage loaded layouts, click on the AYON icon in Unreal’s main taskbar, and select Manage.

You will get a list of all the assets that have been loaded in the project. The version number will be in red if it isn’t the latest version.
To update the layout:
- Right click on the element that has available updates.
- Click Update.
DO NOT update rigs or models imported with a layout. Update only the layout.
Publishing layouts
To publish a layout, you need to create a publish instance.
- Open a level from which you want to publish a layout from.
- Select the actors you want to include in the layout.
- Click on AYON → Publisher ... to open the Publisher screen.
- On the top bar, switch to the Create tab.
- In the Creator screen, select UAsset.
- Set the name of the product.
- Click on Create. This will create a
AyonPublishInstancefile in/Content/AYON/PublishInstances, with the metadata necessary to publish the layout.

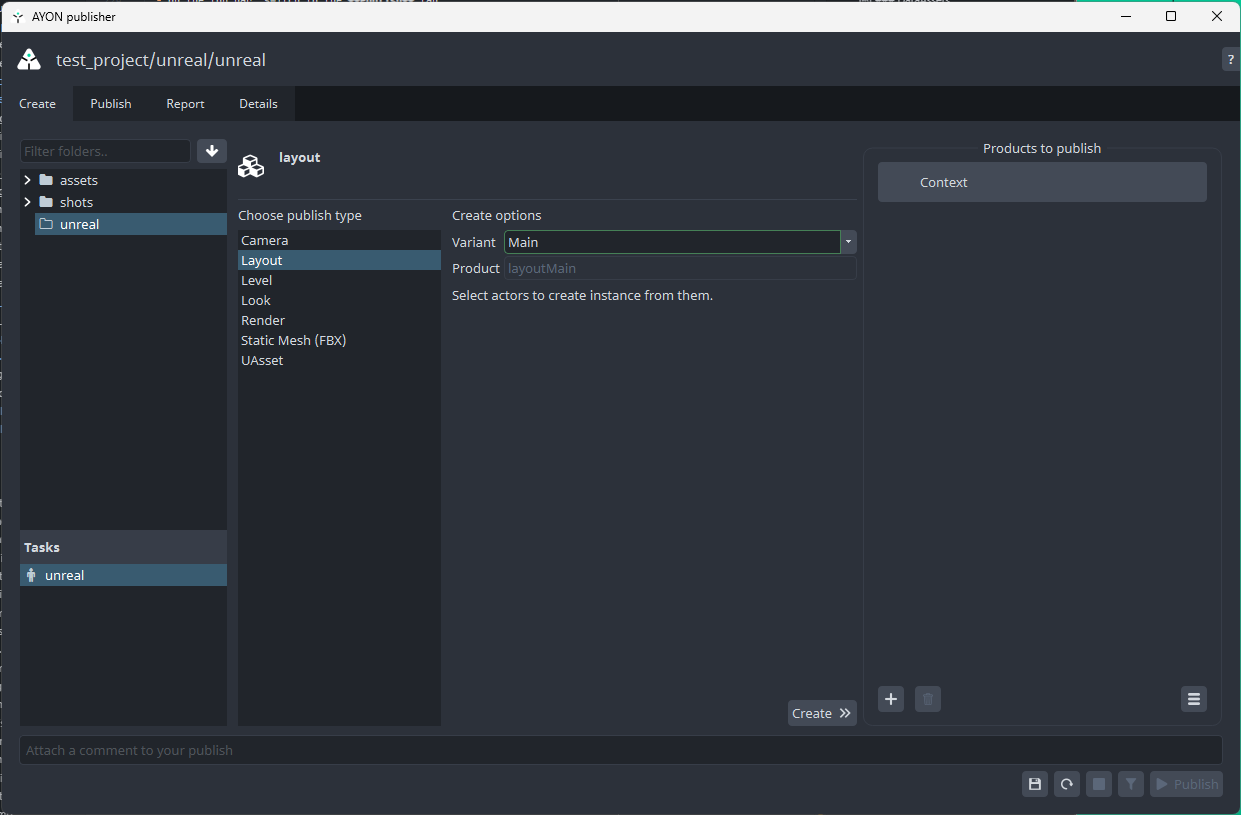
- Click on AYON → Publisher ... to open the Publisher screen.
- On the top bar, switch to the Publish tab.
- On the left, you will see all the publish instances that you have created.
- Select the ones that you want to publish, and click on Publish.
Layout on existing project
In case you already loaded the assets in Unreal, or imported them manually, and have assembled a scene in Unreal, you can still load the layout to match the existing assets.
- Publish a layout from Maya or Blender.
- In Unreal, open a level that contains the assets you want to match with the layout.
- Choose AYON → Load ....
- Right-click your layout.
- Select Load Layout on Existing Scene.

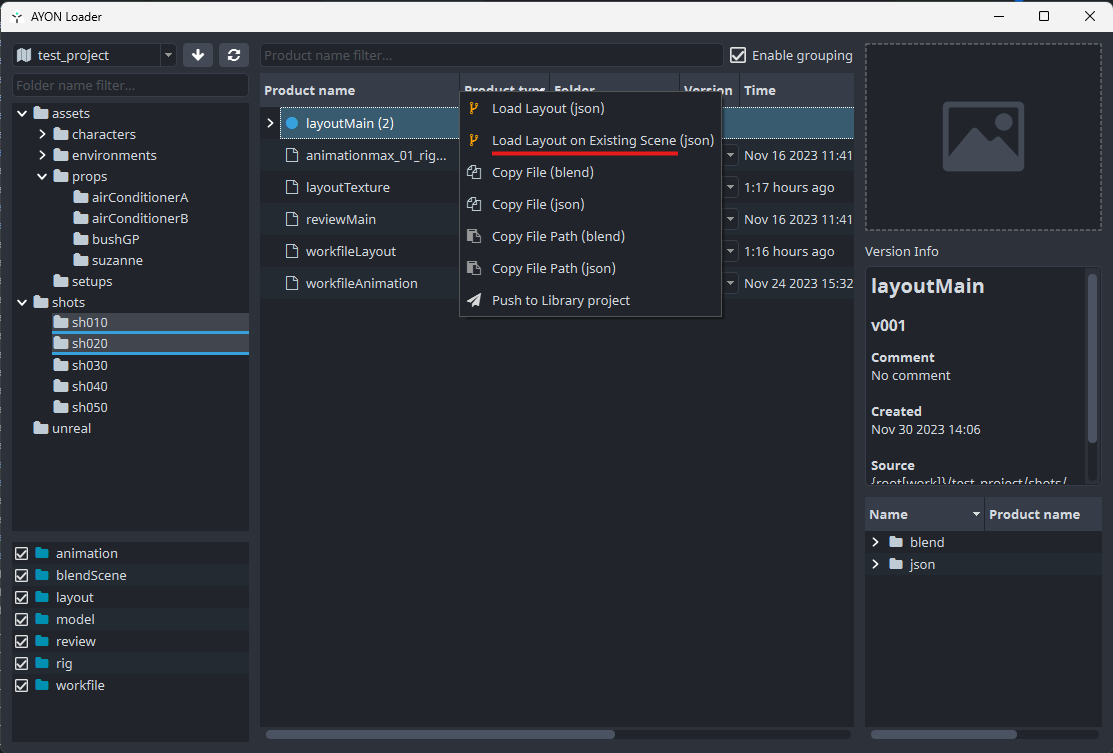
This will create the AyonAssetContainer for each asset you have in the scene that does not have one yet, and will create the AyonAssetContainer for the layout.
You have the option, in Project Settings → Unreal Engine to delete any unmatched asset in the scene.
Cameras with master sequences
There are two different camera options in Unreal, depending on the type of project you are working on. This section explains how to handle cameras with the generation of Master Sequences. To set this mode, you should turn on the setting Generate level sequences when loading layouts in AYON Project Settings → Unreal Engine.

Loading
To load a camera, follow these steps:
- Choose AYON → Load ....
- Right-click your camera.
- Select Load Camera.


If you need to load multiple cameras, you can select more than one task on the left, and you can load them together.

Navigating the project
The camera will be imported in the directory /Content/AYON.
Typically, in a linear animation project, the project will be split into several shots, and shots are organised in scenes. If the project is episodic, scenes will also be organised in episodes. To reflect this structure, whenever you load a camera (or a layout), AYON will create the same hierarchy of your project with Level Sequences and Levels.
Cameras and Layouts follow the same structures, so when loading one of the two, you will get the same hierarchy. If you load one of them first, the whole hierarchy will be generated. If you load the other one later, and the hierarchy was already generated, the new asset will be added to the existing hierarchy.
In the main folder of the camera (or the episode folder, in case of an episodic project), you will find the master level and the master level sequence and the folders for all the scenes in the episodes. AYON is then flexible to accomodate any kind of project structure, and each layer will have its own level sequence. Finally, each shot will have again their own level sequence, and their own level.
Updating
To manage loaded cameras, click on the AYON icon in Unreal’s main taskbar, and select Manage.

You will get a list of all the assets that have been loaded in the project. The version number will be in red if it isn’t the latest version.
To update the camera:
- Right click on the element that has available updates.
- Click Update.
Cameras for a single level
Cameras do not require a master sequence. If you are working on a project that does not require a master sequence, you can simply load the camera in the level you currently have open. To set this mode, you should turn off the setting Generate level sequences when loading layouts in AYON Project Settings → Unreal Engine.

Removing Cameras
To remove the loaded layout, click on the AYON icon in Unreal’s main taskbar, and select Manage.
- Right click on the Cameras you want to remove
- Click Remove items
The sequence, map and container associated with the selected layout would be removed. Unreal would dive into the default level map after the deletion.
Loading
To load a camera, follow these steps:
- Choose AYON → Load ....
- Right-click your camera.
- Select Load Camera.


In /Content/AYON you will find a folder with the name of the camera that contains the camera level sequence. The camera will be loaded in the current level open, so you will need to save it, if you haven’t already.
The imported level sequence and map are named accordingly to their allocated folder name, version number and file extension(i.e. testProject_v001_fbx)
Updating
To manage loaded cameras, click on the AYON icon in Unreal’s main taskbar, and select Manage.

You will get a list of all the assets that have been loaded in the project. The version number will be in red if it isn’t the latest version.
To update the camera:
- Right click on the element that has available updates.
- Click Update to latest and Set version.
Every time you update/set the version, Ayon would create a new exclusive version folder which stores the related assets(level sequence and map) in the updated version if they never loaded.
Animations
Loading animations requires a layout loaded with the option to create the level sequences on.
AYON allows you to load animations in Unreal. To load an animation, you will first need to load a layout with the option to create the level sequences on. This is because the animations will be added to the same level sequences generated for the layout.
Loading the layout
To load a layout, follow these steps:
- Choose AYON → Load ....
- Right-click your layout.
- Select Load Layout.


The layout will be imported in the directory /Content/AYON. For more information, we recommend reading the section dedicated to the layout for linear animation.
Removing the layout
To manage the loaded layout, click on the AYON icon in Unreal’s main taskbar, and select Manage.
- Right click on the layout you want to remove
- Click Remove items
The sequence, map and container associated with the selected layout would be removed. Unreal would dive into the default level map after the deletion.
Loading the animation
To load an animation, follow these steps:
- Choose AYON → Load ....
- Right-click your animation.
- Select Load Animation.

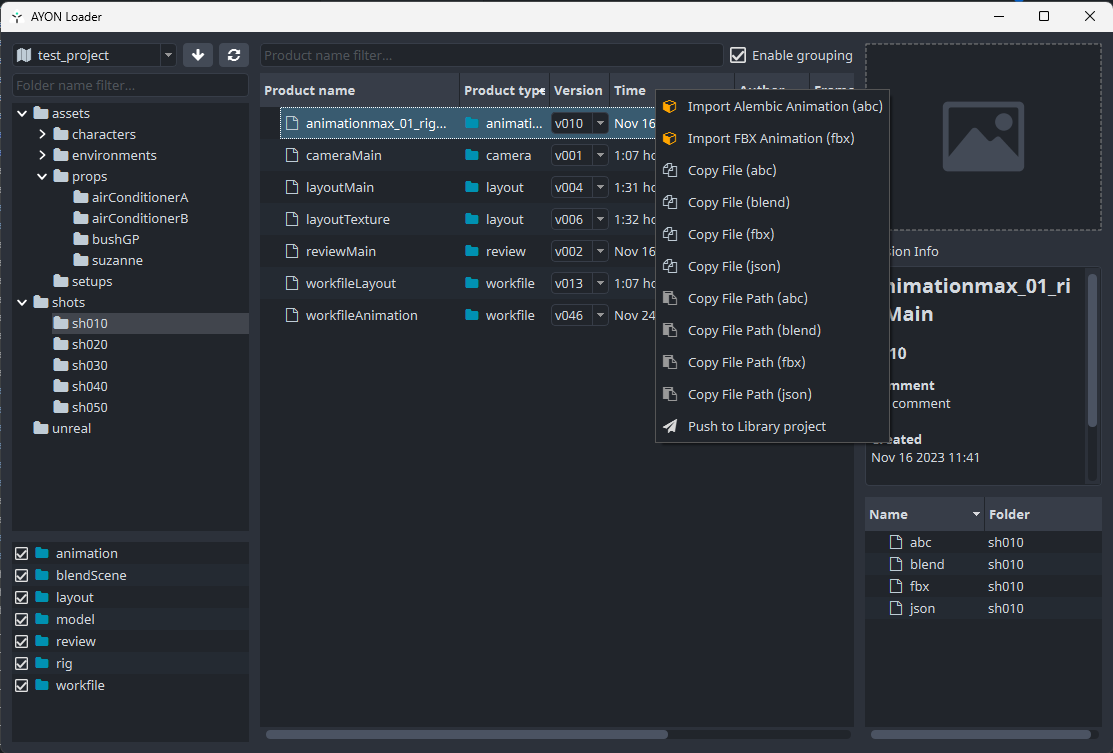
The animation would be imported in /Content/AYON/Animations and it is named accordingly to their allocated folder name, version number and file extension(i.e. testProject_v001_abc)
Connecting animation(and camera) to the sequence loaded from layout
You can connect your loaded animation sequence and camera to the level sequence loaded via layout loader.
- To connect your loaded animation sequence, click on the AYON icon in Unreal’s main taskbar, and select Manage.
- Select the element(s) respectively from the animation and layout product type.
- Right click Actions and Connect Fbx Animation to Level Sequence or Connect Alembic Animation to Level Sequence

- It would add the loaded camera and animation sequence into the level sequence which stores the meshes loaded from the layout.
The current connect action is not applicable for the level sequence which has an existing camera cut track. If users want to connect camera and animation, they need to remove the camera cut track first and perform the action.
Updating
To manage loaded animations, click on the AYON icon in Unreal’s main taskbar, and select Manage.

You will get a list of all the assets that have been loaded in the project. The version number will be in red if it isn’t the latest version.
To update the animation:
- Right click on the element that has available updates.
- Click Update to latest or Set version.
Every time you update/set the version, Ayon would create a new exclusive version folder which stores the related assets(level sequence and map) in the updated version if they never loaded.
Rendering
The rendering requires a layout loaded with the option to create the level sequences on.
Prerequisites
To render with AYON in Unreal, you will need to set a new root in AYON Project Settings. This root will be the folder where all the renders will be published.
- Open AYON Project Settings from the tray icon from Admin → Studio Settings
- Go to Project Settings → Anatomy → Roots.
- Add a new root with the name
renders. - Add the path you want to use for the renders. This path should be an absolute path.

Render settings
AYON offers a set of render settings that you can set from the Projects Settings. Settings like frame rate, frame range, and resolution can be set in the Project Settings → Anatomy → Attributes. Settings more specific to Unreal can be found in Project Settings → Unreal Engine, and these are:
- Render Format, Unreal supports EXR, PNG, JPG and BMP.
- Pre-roll Frames, the amount of warm up frames that will be rendered before the actual render.
Additionally, AYON allows you to prepare a preset of settings directly from the Movie Render Queue and pass them to the render. To do so, you will need to set the path of the preset in Project Settings → Unreal Engine.
Creating the render instance for existing hierarchy
To render and publish an episode, a scene or a shot, you will need to create a Render AyonPublishInstance. The publish instance for the rendering is based on one level sequence. That means that if you want to render the whole project (or a the whole episode), you will need to create it for the master level sequence, but if you want to render just one shot, you will need to create it for that shot.
- Navigate to the folder that contains the level sequence that you need to render.
- Select the level sequence.
- Click on AYON → Publisher ... to open the Publisher screen.
- On the top bar, switch to the Create tab.
- In the Creator screen, select Render.
- Set the name of the product.
- Check the Use Hierarchy checkbox.
- Click on Create. This will create a
AyonPublishInstancefile in/Content/AYON/PublishInstances, with the metadata necessary to render and publish it.


Creating the render instance with new level sequence
To render just a scene, without creating a whole hierarchy, you can create an AyonPublishInstance and a new level sequence from the Publisher.
- Click on AYON → Publisher ... to open the Publisher screen.
- On the top bar, switch to the Create tab.
- In the Creator screen, select Render.
- Set the name of the product.
- Check the Create a new Level Sequence checkbox.
- Set Start and End Frames.
- Click on Create. This will create a
AyonPublishInstancefile in/Content/AYON/PublishInstances, with the metadata necessary to render and publish it.


Start the rendering
To start the rendering, just select the render AyonPublishInstance you want to render, and then click on the AYON icon in Unreal’s main taskbar, and select Render. You can render more than one instance at a time, if needed. Just select all the instances that you need to render before selecting the Render button from the AYON menu.

Publish the render
Once the render is finished, you can publish the render. Click on the AYON icon in Unreal’s main taskbar, and select Publish.
- Click on AYON → Publisher ... to open the Publisher screen.
- On the top bar, switch to the Publish tab.
- On the left, you will see all the publish instances that you have created.
- They will be automatically reorganised to have an instance for each shot. So, for example, if you have created the render instance for the whole episode, here you will have an instance for each shot in the episode.
- Select the ones that you want to publish, and click on Publish.

Farm rendering
Unreal integration also supports rendering on Deadline. Process of creation of render instance is same as higher, difference is in
selection of Farm rendering in Render target.
Deadline rendering process expects physically existing Render Queue and Render Settings uassets in the Unreal project.
By default they are expected at these paths:
/Game/Ayon/renderQueue/Game/Ayon/DefaultMovieRenderQueueConfig.DefaultMovieRenderQueueConfig
These could be modified by AYON admin in ayon+settings://unreal/render_queue_path

AYON Perforce Support
AYON has a dedicated addon for Perforce support. Please refer to Version Control Artist Docs to learn more.
Build Sequence Hierarchy
Ayon supports to build the shot structure accordingly to the folder hierarchies. Users can click on Ayon menu -> Build sequence hierarchy

There would be the folder selector dialog popping up for users to choose the folders to build shot structure.
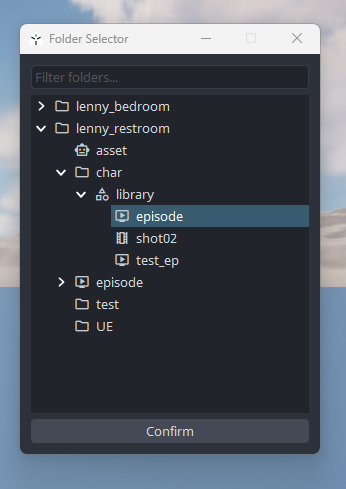
Once the users select the preferred folder(s) to build the sequence, AYON would create map(s) and level sequence(s) inside it.
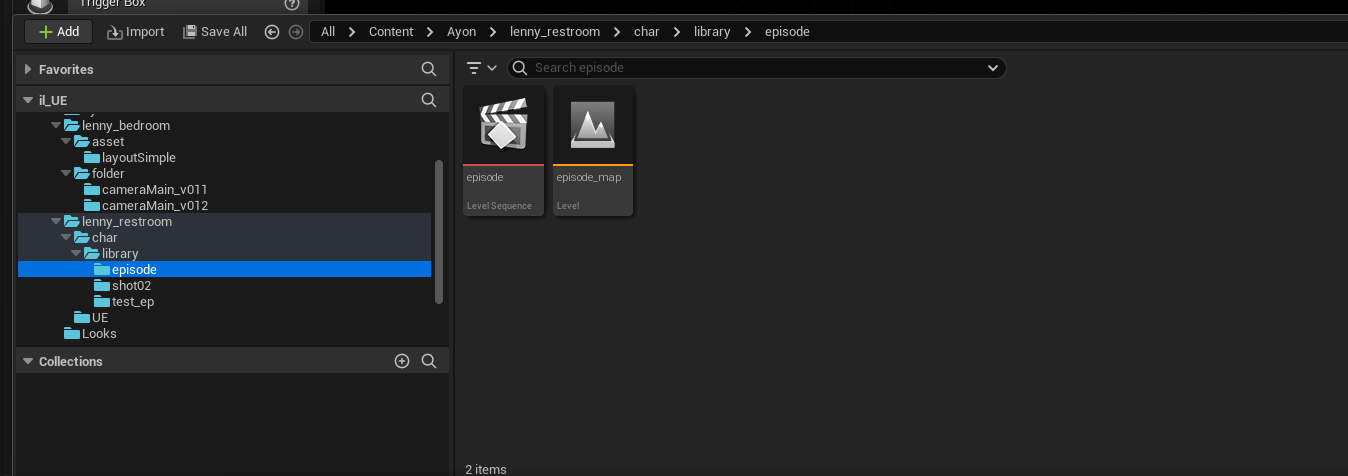
It also builds the level sequence(s) in its parent folder, which stores level visibility of the map(s) and subsequences storing with the level sequence(s) of the preferred folder.


