Unreal Admin Docs
Custom location of the Ayon plugin for Unreal Engine
Sometimes you might want to use custom paths for the location of plugin for Ayon, instead of using the Marketplace one. This can be useful if you want to make changes to the plugin or want to distribuite the compiled plugin. In this section, we will explain how to set these custom paths.
Setting custom paths for the UE project of the plugin
This is the source code of the plugin that you can use to make changes to the plugin. By setting this path, when first launching Unreal, the plugin will be compiled and added to the engine as a plugin, and available for any project you create in the future.
To use a custom path for the UE project of the plugin, you need to set an environment variable called AYON_UNREAL_PLUGIN. This variable should point to the directory where the source plugin is located. For example, if you have the source plugin in C:/Ayon/Source, you should set the following environment variable:
AYON_UNREAL_PLUGIN=C:/Ayon/Source
You can set this variable either in Ayon Studio Setting in applications/unreal/environment, or, from there, to a specific version of Unreal.
Setting custom paths for the compiled plugin
If you already have compiled the plugin and want to distribute it, you can set a custom path for the compiled plugin. By setting this path, when first launching Unreal, the plugin will be added to the engine as a plugin, and available for any project you create in the future.
To use a custom path for the compiled plugin, you need to set an environment variable called AYON_BUILT_UNREAL_PLUGIN. This variable should point to the directory where the plugin is located. For example, if you have the plugin in C:/Ayon/CompiledPlugin, you should set the following environment variable:
AYON_BUILT_UNREAL_PLUGIN=C:/Ayon/CompiledPlugin
You can set this variable either in Ayon Studio Setting in applications/unreal/environment, or, from there, to a specific version of Unreal.
Farm rendering via Deadline
AYON Unreal integration supports rendering on Deadline, please take a look how to setup Deadline here.
Deadline requires Render Queue and Render Settings uassets to be physically present in unreal project at expected locations.
By default they are expected at these paths:
/Game/Ayon/renderQueue/Game/Ayon/DefaultMovieRenderQueueConfig.DefaultMovieRenderQueueConfig
These could be modified by AYON admin in ayon+settings://unreal/render_queue_path.

Deadline workers need to expose location of Unreal editor for rendering via UnrealExecutable (or UnrealEditorExecutable_5_4 for specific version) environment variable.
This variable could be set locally on the workers as needed or could be set and controlled by AYON by setting it in
ayon+settings://applications/applications/unreal/variants/3/environment
Default value could be there as:
{
    "UnrealExecutable": {"windows": "C:/Program Files/Epic Games/UE_5.4/Engine/Binaries/Win64/UnrealEditor-Cmd.exe"},
}
Please notice platform suport with windows key (could be also linux value).
AYON Perforce Support
AYON has a dedicated addon for Perforce support. Please refer to Version Control Admin Docs to learn more.
Manually installing Qt bindings
It might happen that automatic installation of th Qt bindings into Unreal fails. It that case here are manual steps that can be taken to amend it:
Option A (preferred)
Using Unreal's Python interpreter (located on a path like Engine\Binaries\ThirdParty\Python3\Win64 depending on the platform):
python -m pip install pyside6
Option B (unsupported)
You can run following python code either directly from Unreal or using Unreal's Python interpreter:
import pip
pip.main(["install", "pyside6"])
Be aware that calling pip like so is deprecated by pip itself and might not work in newer versions.
For Unreal Engine versions >= 5.4, use pyside6 with version 6.7.x. For earlier versions, use pyside2.
Early releases of PySide 6.8.x has shown issues/crashes. As such, we recommend using 6.7.x releases for the time being in the hope that future releases of 6.8 become more stable.
Setup Publish template for UAsset Product
This requires two configurations:
- Include the
unrealuassetpublish template in the project anatomy. - Link
uassetproduct to its publish template,unrealuasset.
UAsset publish template in project anatomy

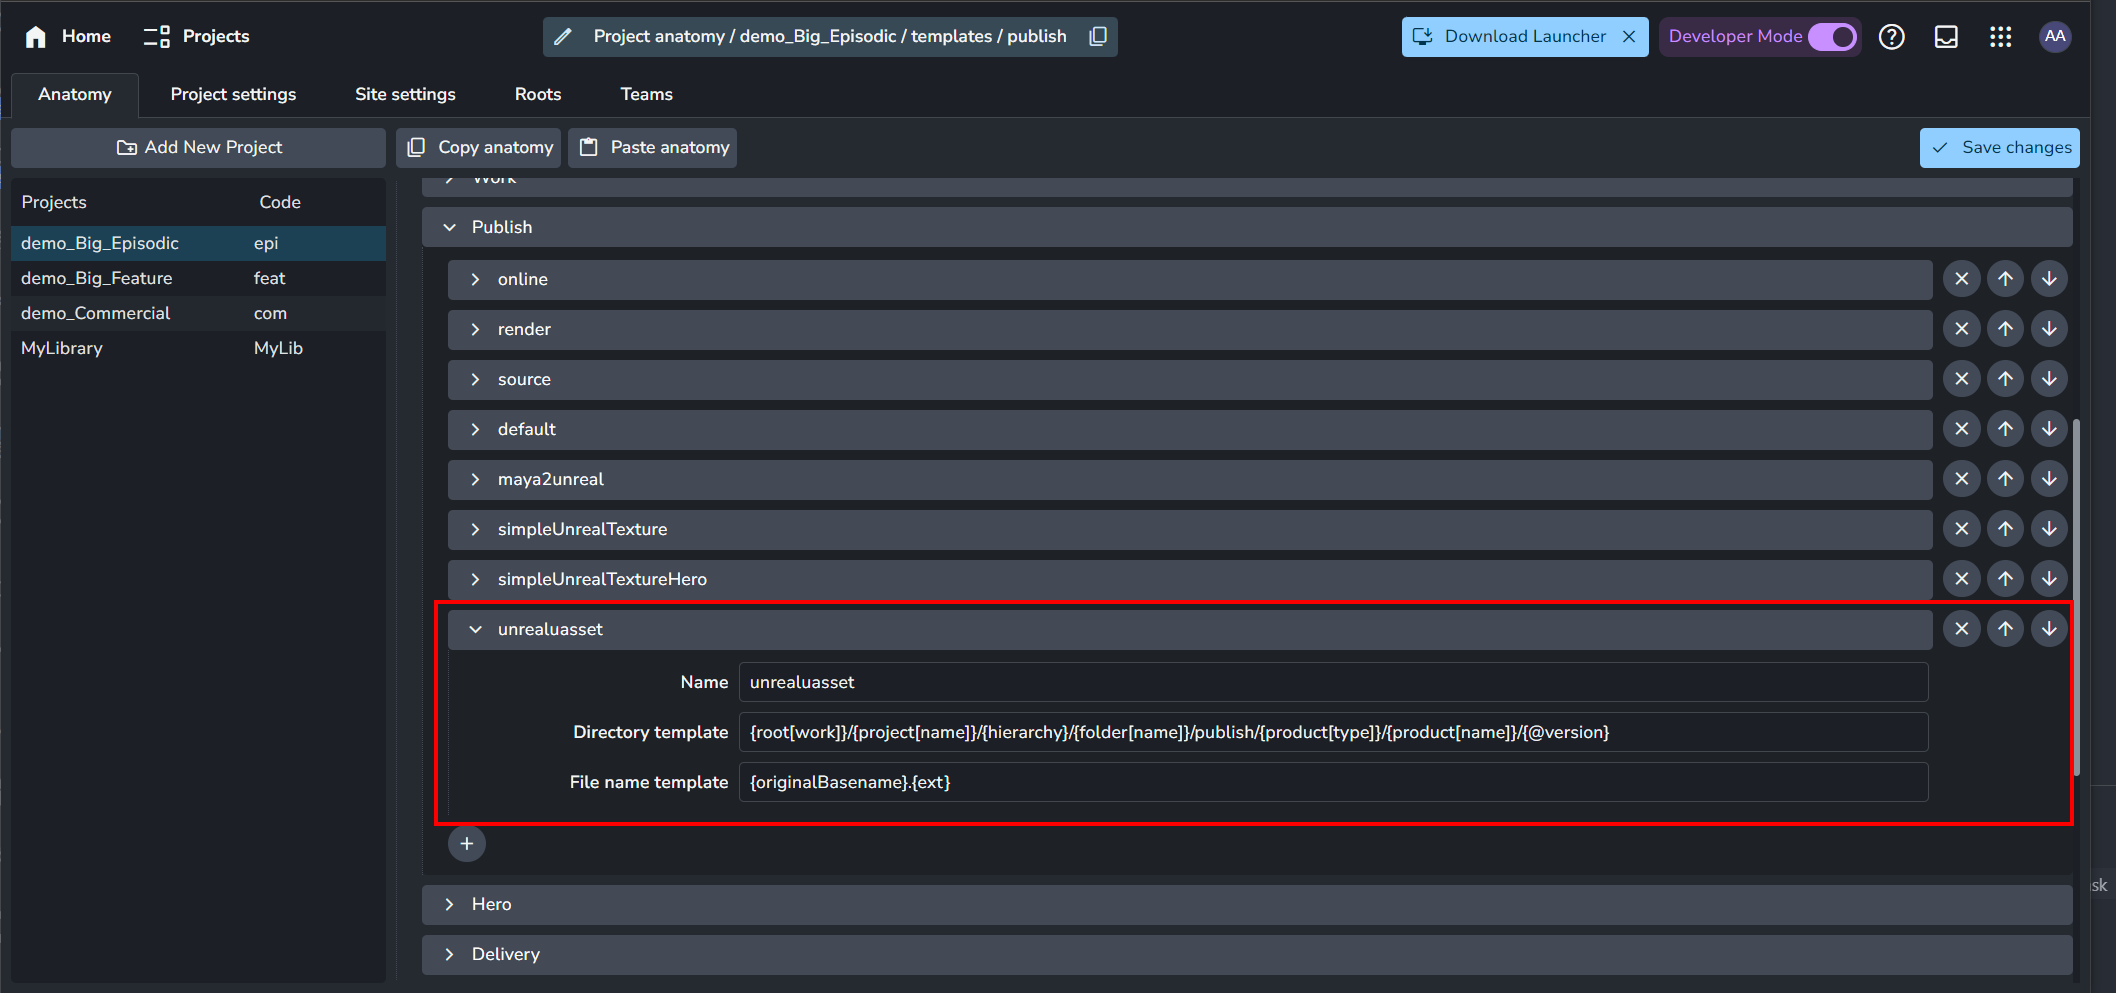
The unrealuasset publish template is added to the default templates in recent AYON server versions.
If you don't have it, you can always create it manually. Follow these steps to create it manually.
Steps to create unrealuasset manually
- go to Project Settings shortcut
P+Pand select Anatomy. - Select your project.
- Find publish template settings, setting location
ayon+anatomy://{project_name}/templates/publish. - Add a publish template by clicking + icon.
- Fill in the publish template with
unrealuasset.unrealuasset publish template{
"name": "unrealuasset",
"directory": "{root[work]}/{project[name]}/{hierarchy}/{folder[name]}/publish/{product[type]}/{product[name]}/{@version}",
"file": "{originalBasename}.{ext}"
} - Once you finished to add the template, Click Save Changes.
Add template name profile in core settings
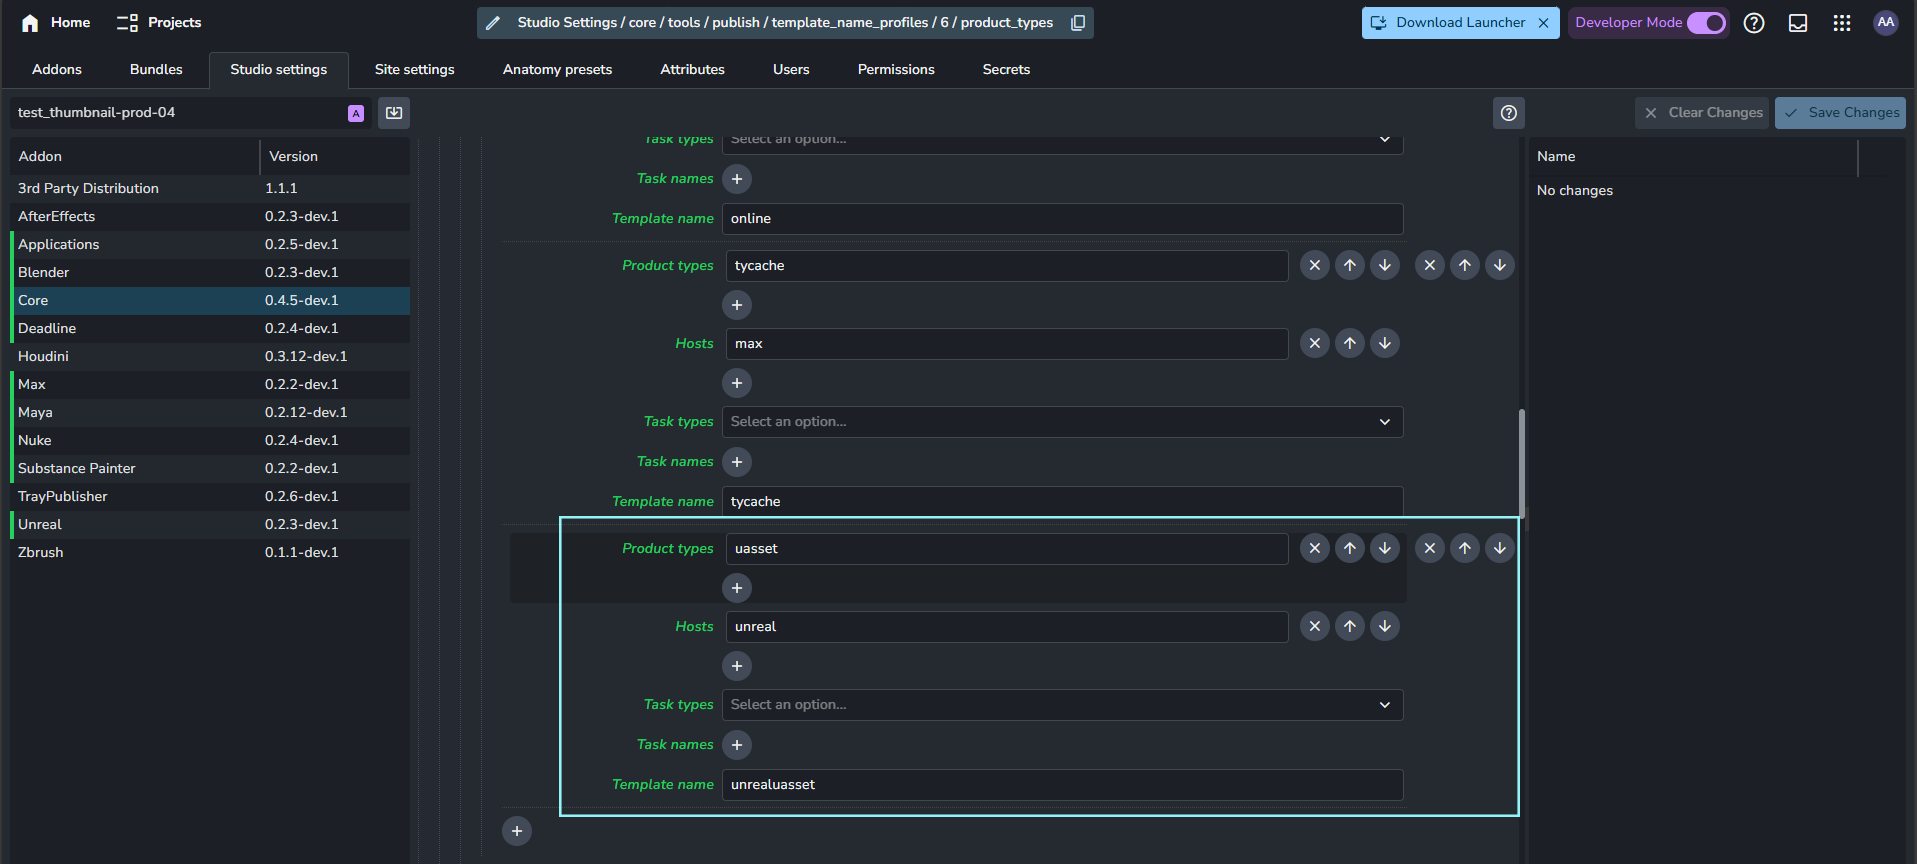
The next step is to link the unrealuasset publish template to the uasset product type.
This is done via template name profiles in core addon settings ayon+settings://core/tools/publish/template_name_profiles
Steps:
- Locate the template name profiles settings, Setting location
ayon+settings://core/tools/publish/template_name_profiles. - Add new template name profile using the + icon
- Add
uassetto Product types. - Add
unrealto the Hosts. - Set Template name to
unrealuasset


